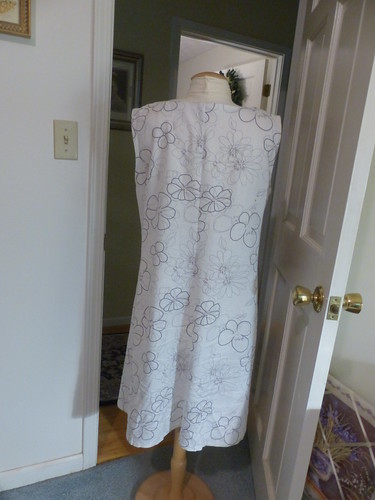
I sewed a lined vest out of a wool boucle that I bought about 30 years ago. The pattern doesn’t include a lining, but since I was sewing the vest in a wool boucle, I also lined it with a colorful silky polyester. The pattern directions use bias fold tape to finish the armholes and includes pockets in the front seams, but the pockets were too small to be useful and they added too much bulk to the front of the vest so I omitted them.
Pattern: Simplicity 1499 (view C)
Fabric: Wool Boucle (garment) & silky polyester (lining)
Needle/Foot:
Machine used: Kenmore
 I’ve never added a lining to a garment before when the pattern did not include pattern pieces and instructions for doing so. I searched around the internet a bit to find some useful instructions about how to do it and read over some of my patterns that include lining directions. I took my time on this project because I wasn’t entirely sure about what I was doing and I wanted to have a nice outcome in the end.
To make the lining, I cut out the pattern pieces for the front, front side, and back of the vest, and sewed the lining up just as I had sewn the fabric for the body of the garment. Most of the instructions I found for adding a lining to a vest (or sleeveless dress) did not include any information about collars, so I wasn’t quite sure what the proper order should be to attach the lining to the garment. I figured out the proper order by trial and error. When I sewed a seam in the wool boucle, the seam threads disappeared into the fabric, which made it very tedious to pick out a seam if I sewed it in the wrong order, so I hand basted most of the seams, then checked to see if the order worked properly BEFORE I sewed the permanent seam. This took several iterations to figure out the best order.

The order that worked was:
- Sew garment side and shoulder seams and collar into garment – I left the side seams unsewn. The pattern instructions directs the sewer to fold the collar piece in half and sew almost the entire collar together, leaving about 2 inches open to turn the collar and to sew it to the back of the garment. Since I was lining the garment, I only sewed the sides and back edge of the collar together and left the side of the collar that is sewed to the garment open. Then I turned the collar and sewed the collar to the back of the garment, matching the notches and center of the garment with those of the garment. I also sewed the tab and buttons on the back of the garment.
- Sew garment facing to matching lining pieces
- Sew the lining side and shoulder seams together (treating facing and lining as one piece of fabric) – since the garment facing was cut from the same front pattern piece, it was not necessary for me to also cut this front pattern piece in the lining fabric. If I make this vest again, I will only cut the lining fabric out of the side front and back pattern pieces and sew the lining side front fabric directly to the facing front fabric.
- Sew the lining and the garment together at the neck and front.
- Sew the lining and the garment together at the armholes
- Sew the lining and the garment together at the bottom
- Top stitch front, neck, collar edges and along the bottom.
 I trimmed about an inch off the length of the lining and pressed the vest so the fabric was folded up about 1/2 inch to the inside.
Pressing the seams as I sewed them was a bit tricky. The boucle was very thick so I couldn’t get a nice crisp press and I also didn’t want to flatten the boucle loft so I used a light hand when ironing. I also dampened a washcloth and placed that on top of my ironing board where I placed the fabric to press and I used an ironing cloth when I pressed any seam on the vest.
Understitching the armholes and the facing was also difficult to do given the bulk of boucle and the lining material. Since I knew I was going to top stitch most of the seams, I didn’t understitch the front facing or the armholes. Instead I pressed the seams carefully so that none of the lining fabric was showing on the outside of the garment and then I top stitched the most of the seams very slowly to make sure the lining was not showing.
I’m pleased with how well the vest turned out and am looking forward to wearing it this winter. I don’t have a need for many vests so I think this will be the only vest I make for myself this year, but I might make another one next year.
Like this:
Like Loading...


